Today’s plan is to get out to the housebus and start the long process of sealing up all the windows.
I’ve known since I first picked up the bus that it had moisture problems – the musty smell was unmistakable, and the thin layer of mildew on all the seats was unpleasant at the least. I thought I took care of the biggest leaks early on, and maybe I did, but I know that at least a few of the windows are still a bit leaky. And knowing how prone the seals around bus windows are to cracks and gaps even straight from the factory, I figured I’d be re-sealing all the windows sooner or later.
Today’s housebus score: A decent, newish window AC unit, three milk crates, and almost a dozen 8-oz mason jars!
The window AC is a Frigidaire, and looks to be in really good shape! Aesthetically, at least. I still need to plug it in and make sure it works, and then find the specs online to see what kind of BTU I can expect out of it. As with all of my free finds, if it doesn’t work out, I can just pass it on.
The milk crates were something I’d only kindof been thinking about? Like, I know this conversion is already running the risk of looking like a white trash yard sale, so I’m not planning to use these for any kind of visible storage, BUT I did see this video on Will Prowse’s channel where he built a DIY LiFePo4 battery in a milk crate, and it certainly looks like they’ll come in handy!
And the jars, also, weren’t something I was seeking right now, but I know I want a bunch of them to mount under the kitchen cabinets for small dry-goods storage. Also, I might get into canning some stuff from time to time, who knows! Looks like they were used for candles recently, so they’ve got some cleaning to be done still.
And a little bit of progress on the floor today: With the starboard-rear quarter of the bus totally done and painted up, I was able to move the foam panels over and get into grinding and scraping rust off the port side. Scrape, grind, sweep, scrape, grind, sweep. Then I was able to hit it all with the rust-convertor spray paint, and now it gets to sit for a couple days while I figure out how to do the enamel coat — after the last attempt, I’m nearly out of the paint already, and also my roller has dried into a rigid, unusable sponge. I could try to use the roller, I suppose, but I wouldn’t get very far with the paint I have left. Gotta try again to contact the seller up in Vancouver who had three quarts, see if it’s still available.
Comments Off on Housebus Score: More Stuff, Some Progress
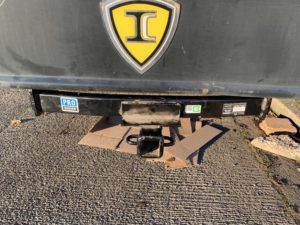
I’ve been chipping away at the bus the last couple weeks, knocking off small projects here and there. Today’s unlocked achievement was the surprisingly-easy install of a tow-hitch receiver, something I’ll need when I hit the road to tow my get-around vehicle with me.
It’s a nice, gray, blustery day out there in Portland this morning. I’m still planning to get out and glue down the pennies to the floor, and also to start working on attaching the tow-hitch receiver to the rear chassis.
Thinking about the subfloor, I’m a little concerned that the rustoleum spray paint isn’t going to give me the coverage I’m hoping for. Most of the floor isn’t covered in rust, so I’m not sure I need to cover the floor with this convertor paint. I’m thinking that if I maybe just use the convertor on areas where there’s clear rust to deal with, and then go over the whole floor with a good coat of a more basic rustoleum primer, that should give me the protection I need against any future rust. This will also allow the convertor paint I already have to go farther than if I try to use it as a base coat for the entire floor.
So I think I’ll do that. I found a good deal on marketplace for a few quarts of rusto up in Vancouver, I’ll go ahead and pursue that. It adds another step to the subfloor process, but I’m okay with that.
Also, I watched a bunch of videos of skoole subfloor construction again last night as a refresher, to help me map out my strategy, so here goes.
I’m going to frame out the floor with the 2x2s, first outlining along the walls and around the wheel wells. I had thought about doing a ‘floating floor’ – using just glue or friction to wedge everything in place – but the foam panels I have are quite brittle, so the wood is going to need to do more to actually hold everything securely. So, wood-to-metal screws will be used to attach the 2x2s. I’ll Tetris the foam panels into place with 2×2 between them before screwing it all down, and then screwing the OSB down to the wood from above.
I’ll measure to make sure there’s 2×2 joist at each edge of the OSB sheets, otherwise stepping on a seam will cause the foam below to crush, causing the floor to warp and creak like nuts. Ideally I should probably also have wood below any future walls, but I guess I’m hoping that the OSB will help distribute any weight on top of it, and that there’ll be enough 2×2 underneath to support it. Fingers crossed. The only real walls in my floorplan are around the bathroom, and I’m not dealing with that part of the bus yet anyway, so I’ll keep it in mind when I get there.
Also, do I want to put the shower pan down into the subfloor? Would keep me from having to drill a drain hole down through the foam. Hm. Things to think about.
Taking a different tack this time, going to be using a Brewmaster Recipe Kits Aurora Amber we sell at FH Steinbert (the day job). It’s a partial-boil kit, using a pilsner extract and a few specialty grains. Should be a good, basic amber for the fall season.
Up until this year I’d been fully all-grain in my brewing, but i’ve been making the switch back to extract brews lately, otherwise I wouldn’t even try one of these kits. But I figured, hey, it’s supposed to be simpler, and we had one at work that was set aside for employee use, so I’m giving it a shot!
And because it’s only a partial-boil, I can use my smaller kettle, which is a little easier to clean.
I did swap out the provided yeast, since part of why this one was set aside is that the yeast packet had sprung a leak. I’ll be using Flagship A07 from Imperial instead, it’s a great all-around ale yeast that works with a lot of different styles.
Getting ready to drain the grains into a smaller pot.